Action buttons for plant batches
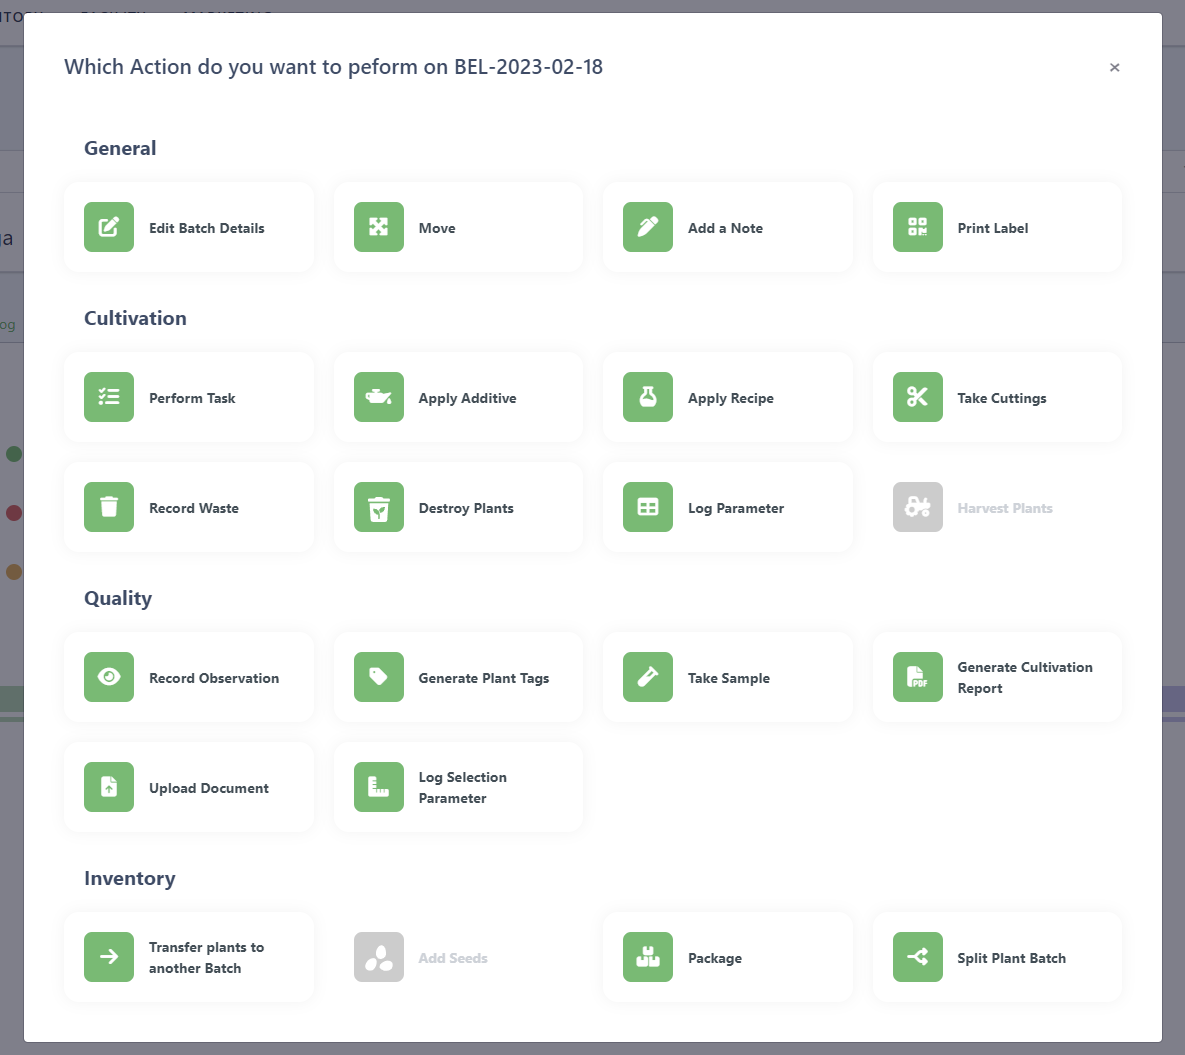
Once you have created one or more plant batches in your projects, you will need to enter relevant information at each stage. To enter information or in other words perform the actions you need to click on the Actions Button on the top right of the plant batch view.
Generating plant tags
Here, an individual identification number can be created for each plant of the batch. At the same time, QR codes are automatically generated for each plant, which facilitates the referencing of each plant in the cultivation area. This button will only appear if you have not yet generated plant tags for the plants in that batch.
Click on Generate plant tags.
A confirmation pop-up will appear. Click on Generate plant tags to confirm your action.
The yellow Generate plant tag button will disappear and the following information appears in the blue field:
The system has now assigned a plant ID to each plant.
The number in the Plants field turns from black to green.
If additional plants are added after the plant IDs have been generated once, they will automatically receive a plant ID.
As long as the Generate plant tags button is not clicked, the number in the Plants field remains black. This means the plants do not yet have a plant ID and are not individually identifiable in the plan.

Parameters
Here you have the option to note down various parameters of your cultivation:
To enter parameters, click on Log Parameter.
Under Plant characteristics, enter the Height of the plant.
Under Substrates, you can record the pH value as well as the EC value (Electrical Conductivity) / TDS value (Total Dissolved Solids).
To save your changes, click Save.
Applying additives to a plant batch
In addition to fertilization, the plants must also be cared for and protected. Here, additives such as water, additional fertilizers, pesticides, etc., which are added to the plants throughout their growth, can be recorded:
To add an additive, click on Apply Additives.
Under Filter by category, you can select the category and sub category of the additive you will be adding, this will filter your choices of Additives in the drop-down menu.
Select the Additive, Date, Amount, Unit and the Distribution equipment from the drop-down menu ▼ (mandatory fields). You also have the option to enter the pH and EC value of the additive.
Select if you want to deduct from the available in stock and track which batch was used.
Click on Save to log the application of the additive and return to the Batch overview page.
Note: Each Additive must be individually added beforehand in Inventory > Articles before it can be selected from the drop-down menu. Each Distribution equipment must also be individually added beforehand in Facility > Equipment. Perform Goods In of additives to track batch specific additive information.
Applying additives to several plant batches at the same time
If the same additive is added to several plant batches at the same time, you can record this application for all plant batches in the same project by following this process:
Navigate to Cultivation > Projects > Project
In the overview of batches select the batches you would like to apply an additive to
Select them by clicking on the row or by clicking the select all button next to the search bar
You will be able to add more batches to the selection of receiving batches in a step 4.
Click on the Button +Additives on the top right
The window to apply additive to selected plant batch appears
Input all the necessary information about the additive on the top part
Add more batches to the selection on the bottom part
Click Save
The amount will be distributed according to the amount of alive plants per batch.
Note: If you want to track which batch of additive was applied, toggle the Do not subtract from inventory toggle off and specify which batch was used.
Editing and application of additives to a plant batch
To edit an application of an additive follow these steps:
Navigate to the plant batch the application of additives you want to edit are located
Click on the tab Additives
In the column Actions, click on the Edit Button
Perform the changes and enter a reason for making the changes
Click on Save
Taking clones from a plant batch
Clones, or cuttings are the parts of plants cut for the purpose of vegetative propagation. A clone/cutting is put into a growing medium so that it will take root of its own and then develop into a new, independent plant.
Taking clones from the plant batch view
Click on Actions
Click on Take Cuttings.
The Take Clones: Create New Plant Batch dialog box opens.
Enter the Amount of clones/cuttings you will take and all the properties of the plant batch.
Click the green Save button to confirm your action.
Note: Cuttings cannot be taken in the immature phase.
Note: Taking cuttings from a tagged plant batch without specifying the exact plant means the system cannot trace back from which plant the cuttings originated from.
Taking clones from a single plant (tag)
In the Batch overview, click on the green highlighted number of plants in the Plants field.

A numbered overview of all plants in this batch opens up and you can search in the list for the plant to be cloned by using its corresponding ID.
When you have identified the plants to be cloned, click in the orange button next to it relative to Take cuttings.

The Take Clones: Create New Plant Batch dialog box opens.
Enter the Amount of clones/cuttings you will take and all the properties of the plant batch.
Click the green Save button to confirm your action.
Note: Cuttings cannot be taken in the immature phase.
Harvesting a plant batch
Click on the button Harvest Plants This button only appears when the plant batch has reached the harvest phase and has living plants.
Enter a Harvest Batch ID for the harvest batch that will be created using this action.
Enter the Harvest Date.
Select the Harvest method from the ▼ drop-down menu.
You can choose to harvest all available plants to keep the same batch ID. This option is only available if the plant batch has not been partially harvested yet.
The last step in this window is about choosing when you want to weigh the harvested plant material.
For all the post harvest processing tasks and drying the system needs to know how much weight is available.
You can choose to weigh right when you cut the plant and it goes into processing or you can wait with weighing until you start drying the plant material.
Depending on what you chose you will be asked to enter the weigh ins right away or not.
If you choose to weigh the whole plants before any processing you will be able to weigh in the plants from the harvest batch as well. This means you don’t have to do it when you create the plant batch, allowing you to do it later will allow you to create the harvest batch and prepare the required labels and containers.
Now you can click next to go to the part where you will be selecting which plants to harvest and in which area they are.
Harvesting untagged plants
If you are harvesting an untagged plant batch you can now enter from which sub areas you are harvesting how many plants from.
Next the area where the harvested plants will be stored at has to be input
Depending on the selected weighing option it is also possible to directly weigh them in.
If weigh processed plant parts before drying was selected the option to weigh in will not appear.
To weigh in follow these instructions:
Above the weigh in table select:
Equipment used to weigh (scale) (optional)
Container the plants are loaded into (optional)
The unit of the measurements (mandatory)
The weight displayed on the scale (mandatory)
Click Add to table
Repeat the above steps until all plants have been weighed in.
If you have a QR code scanner attached to your device you are able to scan the QR code of the equipment used for weighing and the container and the system will automatically select the correct equipment or container.
Harvesting tagged plants
At Harvest plant selection, choose if you wish to manually select the plants to harvest or scan the QR code.
To manually select the plants for harvest, enter the Plant Nr. or select it from the ▼ drop-down menu.
If you chose to weigh all available plants you will not be required to input the plant ID.
Enter the unit and wet weight of the plant
Click the Add to table button to add that plant to the harvest.
Repeat these steps for each individual plant you wish to harvest.
When you are done, click the Save button to log your harvest.
Note: Each Area must be created beforehand in Facility > Areas before it can be selected from the drop-down menu.
Applying a recipe to a plant batch
By clicking on the button Apply Recipe, it is possible to log the application of several fertilizer components simultaneously, based on pre-defined recipes:
Click on the button Apply Recipe.
From the ▼ drop-down menu, select the Recipe that was applied, the Date of application, the Distribution equipment, and the Amount of water added to the recipe.
Optionally, you can record the measured pH and EC values of the applied fertilizer mixture.
Click on Save to log the application of the recipe and return to the Batch overview.
Note: Each Recipe must be created first in Cultivation > Recipes before it can be selected. Likewise, each Distribution equipment must be created in Facility > Equipment.
Performing a task on a plant batch
Click on the button Perform Task.
From the ▼ drop-down menu, select the Task performed, the Date, the Amount (number of repetitions of the task).
Optionally, you can specify the used equipment to perform this task.
Click on Save to log the task and return to the Batch.
Note: Each Task must be created first in Quality> Tasks before it can be selected. Likewise, each Distribution equipment must be created in Facility > Equipment.
Adding an observation about a plant batch
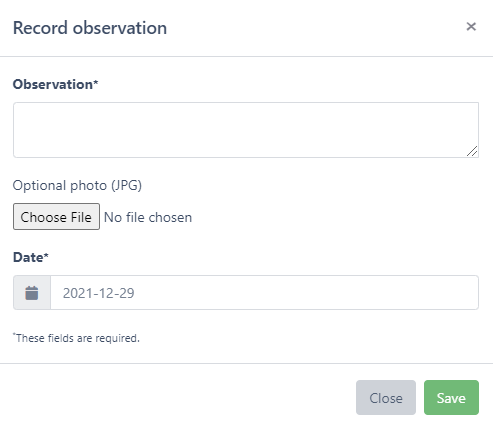
With this function, observations can be logged in the system using notes and photos, e.g. "mildew or spider mite infestation detected". You can also comment on how the cultivation is going and upload a picture of your most beautiful plants.
Click on the button Record Observation.
A field appears in which you can record your Observation and the Date of observation.
Optionally, you can also upload a Photo (JPG file).
To record your observation, click Save.
Moving a plant batch
Plants can pass through different areas within your property during their life cycle. In the dashboard, the current area of a batch is displayed. Previous areas of a batch can be seen in the log.
An entire batch of plants can be moved to another area with the following steps:
Click on button Move.
Use the drop-down menu▼ to select the Target area of the plant batch.
Finish with Save.
Note: Each Area must be created in Facility > Areas before it can be selected.
Waste
Waste can occur for different reasons and at different times during cultivation, harvesting and further processing. The logging of waste is important in terms of complete traceability of production and processing procedures, but also for process optimization for future plant batches.
The Record Waste button in actions of the Batch overview allows you to document any plant waste from a batch, for example collected leaves during the flowering phase or stems during harvesting.
Important: Waste is always batch-specific. This means that any form of waste is assigned to a specific batch of plants.
Before waste can be recorded, a Waste container must be created to which the respective waste is assigned. A waste container can be created by clicking Facility > Containers > +Create container.
Learn more about: Containers
Recording waste from a plant batch
After one or more waste containers have been defined, waste can be recorded in the actions of a plant Batch.
Click on Record Waste button.
The record waste dialog box opens.
The mandatory fields weight (kg), waste container, date and reason must be filled in.
In addition, the type of waste can be specified, for example, stems, roots or leaf material.
Click Save to record your waste and close the dialog box.
Editing waste
To edit an already created waste entry, simply click on the edit button in the action column.

Once clicked you can change all information about the waste entry.
If you change the container, the waste will be removed from the previous container and moved into the newly selected waste container.
Archiving and restoring waste
Waste entries can be archived, which means they are no longer considered for reports and calculations concerning waste. If a waste entry of destroyed plants is archived, then the plants are returned back to alive. Subsequently restoring an archived waste entry will destroy the plants again.
To archive a waste entry click on the archive button in the action column.

Waste generated during the harvesting process is recorded via a separate button.
Learn more about: Recording waste during harvesting
Under Quality > Reports, you can generate a waste report for one or several areas.
Learn more about: Reports
Destroying random plants
If complete plants are being destroyed, this is not recorded with the Waste button, but with the Plants and Container button. The procedure is the same in both cases.
Clicking Destroy Plants button destroys a certain amount of random plants in that batch. If you wish to destroy specific plants from that batch, see the section below.
The specified waste can be viewed in the Batch overview under the Waste tab. In addition, waste is also recorded in the log.
Note: The Destroy Plants button will not appear if the plants in this batch are tagged. If a plant batch is tagged, it is not possible to destroy random plants. You will need to specify which plants you destroy (see section below).
Destroying specific plants
In the Batch overview, click on the green number in the Plants field. A numbered overview of all plants in this batch opens up.
You can search the list for the plant to be destroyed by using its corresponding ID.
When you have identified the plant to be destroyed, click the red Trash icon.

The Destroy plant and record waste dialog box opens.
Fill in the mandatory fields: Weight, Unit, Waste container, Date and Reason.
Click Save to confirm your changes and close the dialog box. The corresponding plant is marked as destroyed and the plant status is changed from alive to waste.
Note: Destroyed plants can be individually recorded during all plant phases (immature phase, vegetative phase, flowering phase) with the exception of the harvest phase.
The specified waste can be viewed in the Batch overview under the Waste tab. In addition, waste is also recorded in the log.
Taking a sample from a plant batch
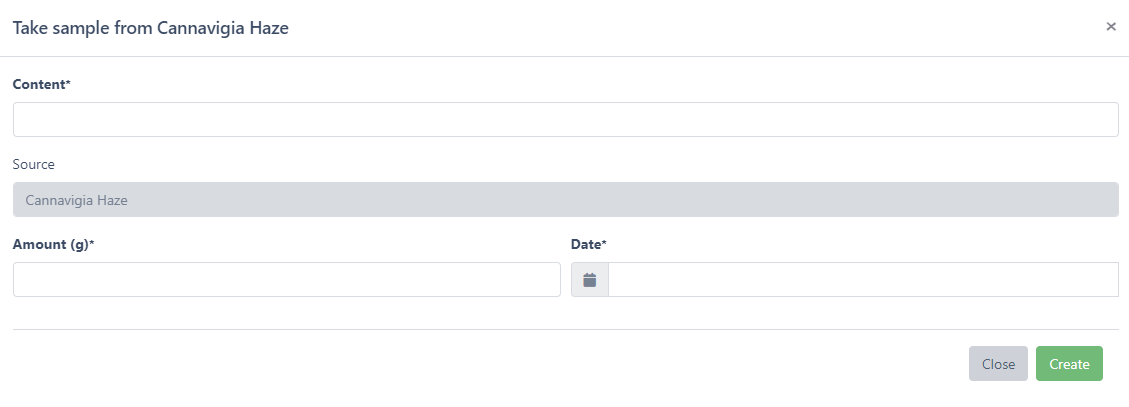
Click on green button Take sample.
The Take sample dialog box opens.
Fill in the mandatory fields: Content, Amount (g) and Date.
Click Save to confirm your changes and close the dialog box.
You will be brought to the Samples page where you can see your newly created sample.
Adding a note to a plant batch
Notes can be recorded in all sections and viewed in the respective function.
Click on green button Add Note.
Enter your notes, ideas and thoughts here.
Click on Save to record the note.
Generating a plant batch Cultivation Report
Click on green button Generate Cultivation Report.
The system generates a plant batch report in PDF format with a summary of all edits in the log for the selected batch.
Printing Labels for a plant batch
Click on green button Print Label.
The system generates a QR code for this batch that is sent to the Print Center. Scanning the QR code, allows you quick access to the Batch overview.
Transferring plants from plant batch to another plant batch
Transferring untagged plants
Click on the green button Transfer plants to another batch.
The Transfer selected plants to plant batch dialog box opens.
Fill in the mandatory fields: Amount of plants, Plant Batch (Receiving Plant Batch) and Reason.
Click Save to confirm your changes.
Note: Receiving plant batch must be previously created before it can be selected. It has to have identical cultivar, phase, origin (seed or clone) of the source plant batch and it cannot be a tagged plant batch.
Note: After transferring plants, note that logged tasks and additives are copied from the source batch to the receiving plant batch.
Transferring tagged plants
In the Batch overview, click on the green highlighted number of plants in the Plants field.

A numbered overview of all plants in this batch opens up and you can search in the list for the plant to be transferred by using its corresponding ID.
When you have identified the plants to be transferred, select them and click the green button Transfer selected Plants on the upper right corner.
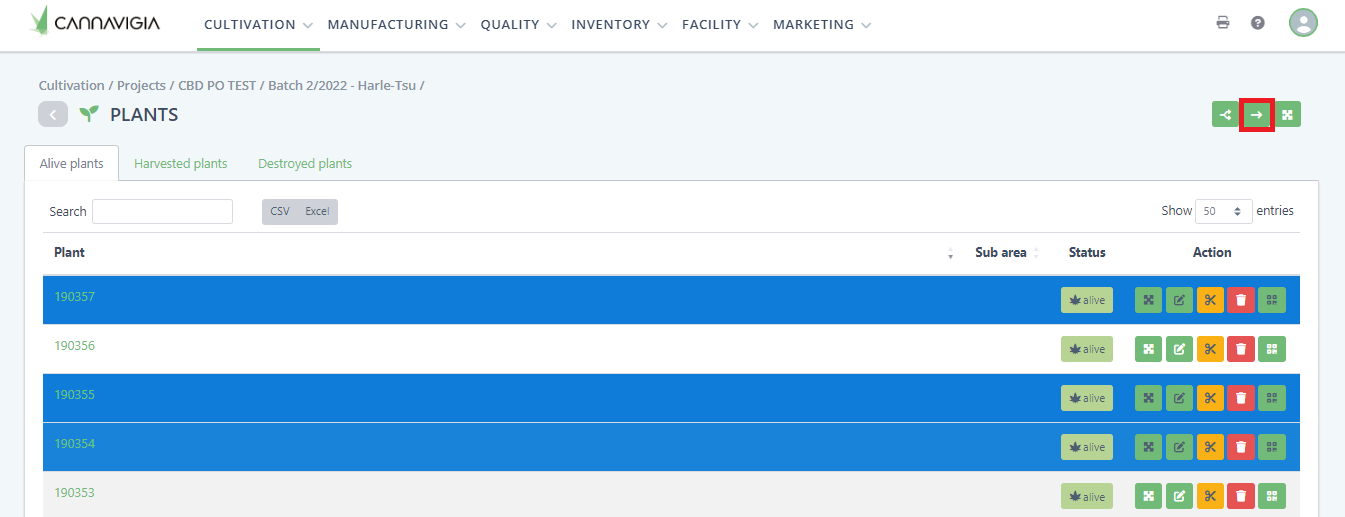
The Transfer selected plants to plant batch dialog box opens.
Fill in the mandatory fields: Plant Batch (Receiving plant batch) and Reason.
You can also select more plants from the drop-down menu ▼ and click the green button Add, or remove selected plants by clicking the red icon next to the plant ID.
To add all alive plants click on the Add all plants button
Click Save to confirm your changes and close the dialog box.
Note: Receiving plant batch must be previously created before it can be selected. It has to have identical cultivar, phase, origin (seed or clone) of the source plant batch and it has to be a tagged plant batch as well.
Note: After transferring plants, note that logged tasks and additives are copied from the source batch to the receiving plant batch.
Splitting plant batches
Splitting untagged plant batches
Click on the green button Split Plant Batch.

The Create Plant Batch dialog box opens.
Fill in the mandatory fields: Name, Area, Amount of plants and Project.
Confirm information prefilled relative to source plant batch: Cultivation methods, Watering methods and Estimated Duration of Phases.
Click Save to confirm the creation of the new plant batch.
Note: The actual phase start dates of the new plant batch are copied from the source plant batch so both batches will be in the same phase.
Note: After splitting the plant batches, note that logged tasks and additives are copied from the source batch to the new plant batch.
Splitting tagged plant batches
There are two ways of splitting tagged plant batches:
In the plant Batch overview, click in Actions in the upper right corner and then click in the green button Split Plant Batch.

The Create Plant Batch dialog box opens.
Fill in the mandatory fields: Name, Area and Project.
Confirm information prefilled relative to source plant batch: Cultivation methods, Watering methods and Estimated Duration of Phases.
Select the plants to be splitted from the drop-down menu ▼ and click the green button Add one by one. You can also remove selected plants clicking the red icon next to the plant ID.
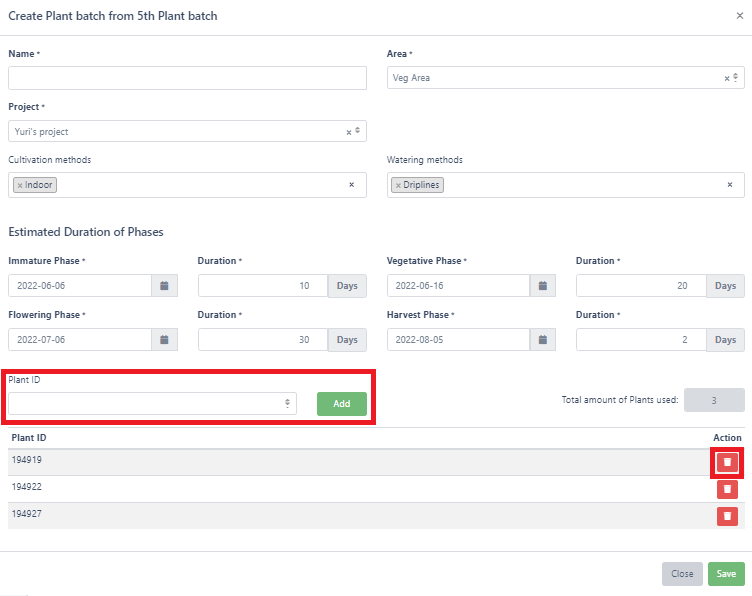
Click Save to confirm the creation of the new tagged plant batch.
2. In the Batch overview, click on the green highlighted number of plants in the Plants field.

A numbered overview of all plants in this batch opens up and you can search in the list for the plant to be splitted by using its corresponding ID.
When you have identified the plants to be splitted, select them and click the green button that represents Split Plant Batch on the upper right corner.
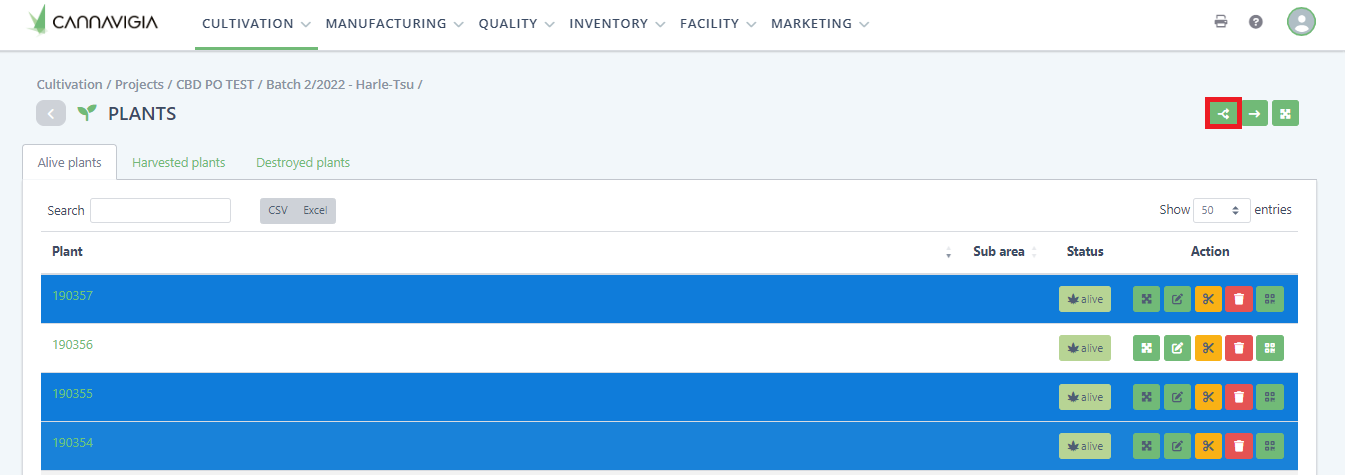
The Create Plant Batch dialog box opens.
Fill in the mandatory fields: Name, Area and Project.
Confirm information prefilled relative to source plant batch: Cultivation methods, Watering methods and Estimated Duration of Phases.
You can also select more plants from the drop-down menu ▼ and click the green button Add, or remove selected plants clicking the red icon next to the plant ID.

Click Save to confirm creation of the new tagged plant batch.
Note: The actual phase start dates of the new plant batch are copied from the source plant batch so both batches will be in the same phase.
Note: After splitting the plant batches, note that logged tasks and additives are copied from the source batch to the new plant batch.
Upload Document to Plant Batch
Click on the green Upload Document button
Select the document and add an optional description of the document
Click on Upload
The document is now uploaded to the plant batch and can be opened in the tab Documents
Remove Document from Plant Batch
Note: Only Administrators can remove documents from a plant batch. Removed documents can not be restored.
Click on the tab Documents
On the right hand side of a document in the action column there is a trash icon remove button.
Click the remove button and confirm the removal of the document
Adding Seeds
Click on the green button Add seeds
Select the Article (seed) you want to add to plant batch from the ▼ drop-down menu.
Click the green button Add and the number of available seeds for that article will be automatically generated.
Enter the Amount used in pieces for the article.
Click in the buttton Add in the lower right corner.
Note: This action will be only visible when the plant batch is in immature phase and if it has seed origin.
Starting and reactivating phases of a plant batch
To start the next phase of a plant batch open the plant batch detail-view (Cultivation > Projects > Project name > Plant batch)
In the Details tab you can see a button Start Phase and Reactivate.
The start phase button will advance the plant batch to the next phase. Depending on the phase different action become available. For example harvesting is only possible in the harvest phase.
If you want to reactivate a phase in case of an accidental click on start phase when the plant batch was not actually in the next phase, click on reactivate of the specific phase you want to go back to.
Advancing phases of multiple plant batches
It is also possible to advance the phase of multiple plant batches at the same time. To do this go the cultivation project view (Cultivation > Projects > Project name)
Select any amount of plant batches by clicking on the row of the plant batch(es) you want to select
All selected plant batches must be in the same phase otherwise the action is not possible
Click on Next phase button
Confirm your action
All the selected plant batches are in the next phase
Packaging plants
To be able to ship plants it your contacts, you can package them with the package action in the plant batch. Follow these steps:
Open the plant batch
Click on Actions
Click on Package
Input all the information to create the article batch
Article
You can only select articles of type plant and depending on the source of the plant batch. Either seedlings (if the source is seed) or clone (if the source is clone)
Area the plants are stored
Batch ID of the packaged plants
Expiration date
Plant passport information. If you don’t require plant passport information you can leave this empty.
Exact plants used (from which sub-area or which plant tags if the plant batch is tagged)
Once created you will be able to follow the regular goods out process to ship
Look here on how to ship your plants to your contacts.